
50+ Best Picnic Food Ideas – Easy To Prepare
Get ready to tantalize your taste buds and elevate your alfresco dining experience with our enticing collection of over 50 picnic food ideas! Picnics are a fantastic way to appreciate nature’s beauty, create unforgettable memories with loved ones, and indulge in a diverse array of mouth-watering homemade treats. They are perfect for various occasions, from family reunions and friendly gatherings to romantic dates and celebrating milestones.
Breathe in the fresh air, enjoy picturesque scenery, and sample delightful dishes in a relaxed and intimate atmosphere. To make your picnic even more enjoyable, remember to bring along fun games, a cozy blanket, and refreshing beverages.
This blog post is your ultimate guide to planning a memorable picnic, including the idea of potluck picnics – where everyone contributes a dish, creating a diverse and exciting feast that encourages sharing and bonding. Our list of over 50 picnic food ideas will not only be Instagram-worthy but will also leave everyone craving more. So, pack your basket, head to your favorite location, and savor the simple pleasures of outdoor dining with our irresistible picnic food ideas for every occasion!
Beverages ideas for particularly good picnic experiences:
1. Sun Tea
A classic and refreshing summer beverage, sun tea is the perfect addition to your picnic experience on hot summer days. There’s no need to heat up the kitchen! Using the power of sunlight, you can brew a delicious and easy tea with your favorite tea bags, sweetener, and citrus slices. Black tea is commonly used, but you can experiment with any flavor of tea, such as herbal tea, to find the strength you want. Enjoy this cool and delightful drink as you soak up the sun!
Serves: 6-8 glasses (1 gallon)
Preparation time: 5 minutes
Brewing time: 3-4 hours
Tools: Large glass jar, lid or cheesecloth, pitcher or individual glasses, spoon (for stirring)
Ingredients:
- Cold water, enough to fill the glass jar (1 gallon)
- 6-12 tea bags, depending on desired strength (black tea or any flavor of your choice)
- Sweetener of your choice, such as honey or agave nectar (optional)
- Citrus slices, such as lemon or orange (optional)
- Ice for serving
Instructions:
- Fill the large glass jar with cold water (1 gallon).
- Add the tea bags to the jar. Adjust the number of tea bags depending on the desired strength and the type of tea you’re using. For example, you may need more tea bags for a more mildly flavored tea.
- If desired, add sweetener and citrus slices to the jar. Stir to mix.
- Cover the jar with a lid or a piece of cheesecloth.
- Place the jar in direct sunlight for 3-4 hours, allowing the tea to brew.
- Once the tea has brewed to your liking, remove the tea bags and citrus slices.
- Transfer the tea to a pitcher or individual glasses filled with ice.
- Serve and enjoy your refreshing sun tea at your picnic! Remember to use a glass jar that can handle the heat and pressure from the sun.
2. Sparkling Strawberry Lemonade
This Sparkling Strawberry Lemonade is a perfect and refreshing picnic beverage for those warm and sunny days. The combination of fresh strawberry puree, zesty lemon juice, sweet simple syrup, and sparkling water creates a bright and beautiful citrusy drink that everyone will love.
Serves: 6-8 glasses
Preparation time: 10 minutes
Tools: Blender, pitcher with a secure tight lid, stirring spoon
Ingredients:
- 1 cup fresh strawberries
- 1 cup fresh lemon juice
- 1 cup simple syrup
- 4 cups sparkling water
- Ice for serving
Instructions:
- Blend the strawberries in a blender until they become a puree.
- In a pitcher, mix the strawberry puree, lemon juice, and simple syrup.
- Stir the mixture well until all the ingredients are well combined.
- Add the sparkling water to the pitcher and stir again. Make sure to keep the sparkling water separate until you’re ready to serve.
- Pour the Sparkling Strawberry Lemonade over ice and enjoy this refreshing drink on a hot day picnic!
3. Grapefruit Peach Sangria (Alcoholic Beverage)
A refreshing and fruity beverage, perfect for enjoying on a sunny picnic day. The combination of grapefruit, peaches, and a hint of citrus from lemons and limes creates a delightful flavor that pairs well with your favorite white wine and a touch of sparkling water.
Serves: 6-8 glasses
Preparation time: 10 minutes
Tools: Large pitcher with a secure lid, knife, cutting board, stirring spoon
Ingredients:
- 1 whole grapefruit, sliced
- 2 peaches, sliced
- 1 lemon, sliced
- 1 lime, sliced
- 1 bottle of white wine (750 ml)
- Sparkling water, to taste
Instructions:
- Using a knife and cutting board, slice the grapefruit, peaches, lemons, and limes.
- Add the sliced fruit to the pitcher.
- Pour in the white wine and use the stirring spoon to combine the fruit and wine.
- Add sparkling water to taste, for a bubbly kick.
- Chill the sangria in the refrigerator until ready to serve.
- Pour into glasses, serve, and enjoy your picnic with this fruity and refreshing sangria!
4. Hippie Juice (Alcoholic Beverage)
Hippie Juice is a perfect summer drink that adds a fresh and fun twist to your picnic. Bursting with sweet watermelon vodka, coconut rum, and pink lemonade, it offers a perfect combination of sweet and tangy flavors. Fresh strawberries and lemon slices can be added for an extra refreshing touch, and it’s easy to make in large batches to serve a group of friends or family. This drink is sure to be a hit at your picnic and leave everyone feeling happy and refreshed.
Serves: 6-8 glasses
Preparation time: 10 minutes
Tools: Large pitcher or container, stirring spoon, glasses
Ingredients:
- 1 cup watermelon vodka
- 1 cup coconut rum
- 2 cups pink lemonade
- 1 cup fresh strawberries, sliced (optional)
- 1 lemon, sliced (optional)
- Watermelon wedges, for garnish (optional)
- Ice for serving
Instructions:
- In a large pitcher or container, combine the watermelon vodka, coconut rum, and pink lemonade. Stir well.
- If desired, add the sliced strawberries and lemon slices to the pitcher. Stir gently to combine.
- Fill glasses with ice and pour the Hippie Juice over the ice.
- Garnish with watermelon wedges, if desired.
- Serve and enjoy your refreshing and fun Hippie Juice at your picnic!
Best & Easy to prepare sandwiches ideas:
1. Club Sandwich (Turkey, Ham, Bacon)
The Club Sandwich is a classic sandwich that is perfect for picnics or a quick lunch. Made with layers of turkey, ham, and bacon, it’s a meat lover’s dream. The sandwich is traditionally made with three slices of bread and includes lettuce, tomato, and mayonnaise. However, variations can be made with additions such as avocado or cheese. Sides that pair well with the Club Sandwich include chips, pickles, or a refreshing fruit salad. A cold drink, like lemonade or iced tea, is the perfect complement to this hearty sandwich. Get ready to take a big bite and enjoy the combination of flavors and textures in every bite.
Serves: 4
Preparation time: 15 minutes
Tools: Knife, Cutting board, Toaster (optional)
Ingredients:
- 12 slices of bread, preferably white or whole wheat
- 8 slices of turkey
- 8 slices of ham
- 8 slices of bacon, cooked until crispy
- 4 large lettuce leaves, rinsed and dried
- 1 large tomato, sliced
- 1/2 cup mayonnaise
- Optional additions: avocado, cheese, or mustard
Instructions:
- Toast the bread slices, if desired, for a slightly crispier sandwich.
- Lay out four slices of bread, and spread a generous layer of mayonnaise on one side of each slice.
- Place two slices of turkey on top of the mayonnaise on each slice of bread.
- On top of the turkey, place one lettuce leaf and two slices of tomato on each sandwich.
- Spread a thin layer of mayonnaise on one side of four more slices of bread, and place them mayonnaise-side down on top of the tomato layer.
- Spread another layer of mayonnaise on the top side of these slices of bread, and then add two slices of ham to each sandwich.
- Place two slices of cooked bacon on top of the ham.
- Add any optional ingredients, such as avocado or cheese, on top of the bacon.
- Spread a thin layer of mayonnaise on one side of the remaining four slices of bread, and place them mayonnaise-side down on top of the sandwiches.
- Cut each sandwich into quarters, either diagonally or into rectangles, and secure each quarter with a toothpick if necessary.
- Serve with your choice of sides, such as chips, pickles, or fruit salad, and enjoy your picnic!
2. Perfect Egg Salad Sandwich for a Summer Picnic
Enjoy the refreshing flavors of this perfect egg salad sandwich on a warm summer day, perfect for any picnic. With hard-boiled eggs, mayonnaise, mustard, and your choice of seasonings, you can create a delicious sandwich that is both easy to make and easy to transport.
Serves: 4 sandwiches
Preparation time: 15 minutes
Tools: Mixing bowl, fork, knife, cutting board, portable container, cooler with ice packs
Ingredients:
- 6 hard-boiled eggs
- 1/3 cup mayonnaise
- 1 tablespoon mustard
- Salt and pepper to taste
- Optional seasonings (dill, pickle relish, parsley, chives)
- 8 slices of your favorite bread
- Optional toppings (lettuce, tomato)
Instructions:
- Peel and roughly chop the hard-boiled eggs, then place them in a mixing bowl.
- Add the mayonnaise, mustard, salt, and pepper to the mixing bowl.
- Mix everything together, mashing the eggs with a fork as you go, until well combined. Add any additional seasonings you prefer, such as dill or pickle relish, and mix again.
- If desired, add fresh herbs like parsley or chives for a healthier twist.
- Spread the egg salad mixture onto four slices of your favorite bread.
- Add any additional toppings, like lettuce or tomato, then top with the remaining four slices of bread.
- Cut the sandwiches into smaller tea sandwiches for easy snacking.
- Pack the sandwiches in a portable container and store them in a cooler with ice packs to keep them fresh until you’re ready to enjoy your picnic.
3. Chicken Salad Sandwich
For a delicious chicken salad sandwich for your next summer picnic, start by mixing chopped chicken, celery, and apples with mayonnaise and a touch of mustard for creaminess and tang. Add in some toasted pecans or cashews for extra texture. Spread the mixture on your favorite bread, such as a crusty baguette or a flaky croissant. For a refreshing twist, you can also add grapes or a squeeze of lemon juice. Pack the sandwiches in a cooler and enjoy the flavor-packed goodness on a warm summer day!
Serves: 4 sandwiches
Preparation time: 20 minutes
Tools:
- Mixing bowl
- Cutting board
- Knife
- Spatula or spoon
Ingredients:
- 2 cups cooked, chopped chicken
- 1/2 cup diced celery
- 1/2 cup diced apples
- 1/2 cup mayonnaise
- 1 tablespoon Dijon mustard
- 1/2 cup toasted pecans or cashews, roughly chopped
- Optional: 1/2 cup halved grapes or 1 tablespoon fresh lemon juice
- 4 crusty baguettes or croissants, sliced in half
Instructions:
- In a large mixing bowl, combine the chopped chicken, diced celery, and diced apples.
- Add the mayonnaise and Dijon mustard to the bowl, and mix until everything is well coated and combined.
- Stir in the toasted pecans or cashews, and if desired, the halved grapes or lemon juice.
- Spread the chicken salad mixture evenly onto the bottom half of the baguettes or croissants.
- Place the top half of the bread on the chicken salad mixture, pressing down slightly.
- Wrap each sandwich individually in plastic wrap or aluminum foil to keep them fresh, and store them in a cooler until you’re ready to enjoy your picnic.
4. Vegan Buffalo Chickpea Salad Sandwich
A delicious and hearty vegan sandwich that combines the flavors of buffalo sauce and chickpeas, perfect for a memorable picnic experience.
Serves: 4
Preparation time: 15 minutes
Tools:
- Mixing bowl
- Fork
- Knife
- Cutting board
- Toaster
Ingredients:
- 2 cans of chickpeas, drained and rinsed
- 1/2 cup vegan mayo
- 4 tablespoons buffalo sauce
- Salt and pepper, to taste
- 8 slices sourdough bread
- 1 cup hummus
- 2 cups fresh spinach
- Optional: Sliced avocado or tomato
Instructions:
- In a mixing bowl, use a fork to mash the chickpeas until you reach the desired consistency.
- Add 1/2 cup of vegan mayo, 4 tablespoons of buffalo sauce, and a pinch of salt and pepper to the mashed chickpeas. Mix well.
- Toast 8 slices of sourdough bread until lightly browned and crispy.
- Spread a layer of hummus on each toasted slice of bread.
- Place a handful of fresh spinach on four of the bread slices.
- Spoon the chickpea salad mixture onto the spinach-covered bread slices.
- Optionally, add sliced avocado or tomato for added flavor and nutrition.
- Top with the remaining bread slices and press down gently to secure the sandwiches.
- Cut each sandwich in half and serve immediately, or wrap in foil to take on your picnic. Enjoy!
5. Tomato Sandwich
Enjoy the delicious flavors of summer with this simple yet tasty sandwich, perfect for your summer picnic.
Serves: 4
Preparation time: 10 minutes
Tools: Knife, cutting board, mixing bowl, spoon
Ingredients:
- 8 slices of sourdough or brioche bread
- 2 large plump and juicy tomatoes
- 1/2 cup mayonnaise
- 1/4 cup pesto
- 1 small red onion, thinly sliced
- 1/4 cup chopped pine nuts
- Optional: oil for deep-frying tomatoes
Instructions:
- In a mixing bowl, combine the mayonnaise and pesto. Mix well.
- (Optional) If deep-frying tomatoes, heat oil in a deep pan or fryer. Fry the tomato slices until crispy and golden, then drain on paper towels.
- Slice the tomatoes into 1/4-inch thick slices.
- Spread the pesto-mayo mixture evenly onto one side of each bread slice.
- Layer tomato slices, sliced red onion, and chopped pine nuts onto four of the bread slices.
- Top with the remaining bread slices, pesto-mayo side down.
- Cut each sandwich in half and wrap them individually for easy transport to your picnic. Enjoy!
Fantastic Tasty Wraps and Rolls:
1. Tuna Wraps
For a quick and easy picnic lunch, try making tuna wraps! These wraps are tasty and low-maintenance, making them perfect for a delicious picnic experience.
Serves: 4
Preparation time: 15 minutes
Tools: Mixing bowl, knife, cutting board
Ingredients:
- 4 tortilla wraps
- 2 (5 oz) cans of tuna, drained
- 1/2 cup blue cheese dressing
- Pinch of cayenne pepper
- 2 cups spinach leaves
- 1 cup cherry tomatoes, sliced
- 1 cucumber, sliced
Instructions:
- In a mixing bowl, combine the drained tuna, blue cheese dressing, and a pinch of cayenne pepper.
- Lay out a tortilla wrap and spread the tuna mixture on top, leaving a small border around the edge.
- Add a handful of spinach leaves, sliced cherry tomatoes, and sliced cucumbers on top of the tuna mixture.
- Fold in the sides of the tortilla and then roll it up tightly from the bottom edge. Secure it with a toothpick or wrap it tightly in plastic wrap.
- Pack the wraps in a cooler with ice packs to keep them fresh.
For variations on this recipe, you can use different types of tuna or veggies, such as adding avocado or red onion. You can also try adding different spices or sauces for extra flavor, such as sriracha or ranch dressing.
2. Sweet Summer Rolls
Sweet Summer Rolls are a perfect treat for a hot and sunny day. These rolls are loaded with fresh fruits and veggies and are wrapped in rice paper. They can be enjoyed as an appetizer, snack, or even a light meal and are perfect for picnics or potlucks.
Serves: 4
Preparation time: 15 minutes
Tools: Cutting board, Knife, Large shallow dish for soaking rice paper, Plate or platter for serving
Ingredients:
- 8 rice paper sheets
- 2 peaches, sliced
- 1 cup strawberries, sliced
- 1 mango, sliced
- 1 carrot, julienned
- 1 cucumber, julienned
Instructions:
- Fill a large shallow dish with warm water.
- Soak a rice paper sheet in the water for a few seconds until it becomes pliable.
- Remove the rice paper sheet from the water and lay it flat on a cutting board.
- Place a few slices of peach, strawberry, mango, carrot, and cucumber in the center of the rice paper sheet.
- Fold the sides of the rice paper sheet over the filling.
- Roll the sheet tightly, sealing the edges.
- Repeat steps 2-6 with the remaining rice paper sheets and ingredients.
- Arrange the Sweet Summer Rolls on a plate or platter, or place them in a mason jar for a more portable option.
- Serve with a sweet and spicy peanut sauce, if desired.
Optional variations:
- Substitute the fruits and veggies with your favorites.
- Add protein like tofu or shrimp to make the rolls more filling.
3. Vegetable Rice Paper Rolls
These Vegetable Rice Paper Rolls are perfect for picnics and can be prepared ahead of time. They are highly customizable, allowing you to experiment with different vegetable combinations for a tasty and healthy treat.
Serves: 4
Preparation time: 20 minutes
Tools:
- A large, shallow dish for soaking rice paper sheets
- A flat surface for assembling the rolls
- A sharp knife for cutting the vegetables
Ingredients:
- 8 rice paper sheets
- A selection of vegetables of your choice, such as:
- 1 cucumber, julienned
- 1 carrot, julienned
- 1 bell pepper, thinly sliced
- 1 avocado, thinly sliced
- Lettuce leaves
- Spicy-sweet peanut sauce for dipping
Instructions:
- Soak the rice paper sheets in warm water until they become soft and pliable (about 30 seconds to a minute for each sheet).
- Place the softened rice paper sheet on a flat surface.
- Layer your chosen vegetables in the center of the sheet.
- Fold the sides of the rice paper over the vegetables.
- Roll the paper tightly to form a compact roll.
- Repeat this process until all the ingredients are used up.
- Serve the rolls with spicy-sweet peanut sauce for dipping.
Mouth-watering tasty savory snacks and appetizers:
1. Bisquick Sausage Balls
Enjoy these Bisquick Sausage Balls for a perfect picnic experience. They are easy to make, flavorful, and great for sharing with friends and family. Serve them hot or cold with your favorite dipping sauce.
Serves: 4
Preparation time: 15 minutes
Cooking time: 20-25 minutes
Tools:
- Mixing bowl
- Baking sheet
Ingredients:
- 1 pound sausage
- 2 cups Bisquick mix
- 2 cups shredded cheese
- Optional: herbs or spices
Instructions:
- Preheat your oven to 350°F.
- In a mixing bowl, combine the sausage, Bisquick mix, and shredded cheese until well blended.
- Optional: Add any herbs or spices for extra flavor.
- Roll the mixture into 1-inch balls and place them on a greased baking sheet.
- Bake for 20-25 minutes, or until golden brown.
- Enjoy your Bisquick Sausage Balls hot or cold with your favorite dipping sauce.
2. Deviled Eggs
Deviled eggs are a classic and easy-to-make savoury snack or appetizer, perfect for picnics or potlucks. To prepare, start by hard-boiling eggs, then peel and cut them in half lengthwise. Remove the yolks and mix them with mayonnaise, Greek yogurt, yellow and Dijon mustard, salt, and pepper until smooth. Spoon or pipe the yolk mixture back into the egg whites and sprinkle with smoked paprika or dried dill for garnish. For a twist, try adding bacon bits and chives to the filling, or use pimiento cheese for a Southern-inspired version. Remember to serve deviled eggs within two hours of removing them from the fridge.
Serves: 4
Preparation time: 20 minutes
Tools:
- Saucepan
- Mixing bowl
- Spoon or piping bag
Ingredients:
- 8 large eggs
- 1/4 cup mayonnaise
- 1/4 cup Greek yogurt
- 1 teaspoon yellow mustard
- 1 teaspoon Dijon mustard
- Salt and pepper, to taste
- Smoked paprika or dried dill, for garnish
- Optional: bacon bits, chives, or pimiento cheese
Instructions:
- Place the eggs in a saucepan and cover them with cold water. Bring the water to a boil over medium-high heat. Once boiling, remove the saucepan from heat, cover it, and let the eggs sit for 10-12 minutes.
- Transfer the eggs to a bowl of ice water to cool for 5 minutes. Once cooled, peel the eggs and cut them in half lengthwise.
- Remove the yolks and place them in a mixing bowl. Mash the yolks with a fork.
- Add the mayonnaise, Greek yogurt, yellow mustard, Dijon mustard, salt, and pepper to the yolks. Mix until smooth.
- If using optional ingredients, mix in bacon bits, chives, or pimiento cheese to taste.
- Spoon or pipe the yolk mixture back into the egg whites.
- Sprinkle with smoked paprika or dried dill for garnish.
- Serve the deviled eggs within two hours of removing them from the fridge.
3. Cornish Pasties
Looking for a delicious savoury snack or appetizer for your summer picnic? Look no further than Cornish pasties! These hand pies have a rich history in British cuisine, originating in the county of Cornwall where they were popular among miners. Traditional Cornish pasties are made with shortcrust pastry and filled with tender beef and vegetables, making them a hearty and satisfying snack. However, there are also variations that incorporate other meats or vegetables. Whether you prefer them hot or cold, these pasties are the perfect addition to any picnic basket. So, why not try your hand at making some and enjoy a taste of British tradition this summer?
Serves: 4
Preparation time: 30 minutes
Cooking time: 45 minutes
Tools:
- Mixing bowl
- Rolling pin
- Baking sheet
- Parchment paper
- Fork
- Knife
Ingredients:
- 2 cups all-purpose flour
- 1/2 cup cold unsalted butter, cubed
- 1/4 cup cold vegetable shortening
- 4-6 tablespoons ice water
- 1/2 pound beef sirloin, cut into small cubes
- 1 medium onion, finely chopped
- 1 medium potato, peeled and finely diced
- 1 small turnip, peeled and finely diced
- 1/2 teaspoon salt
- 1/4 teaspoon freshly ground black pepper
- 1 egg, lightly beaten for egg wash
Instructions:
- In a mixing bowl, combine the flour, butter, and vegetable shortening. Use your fingers or a pastry cutter to work the butter and shortening into the flour until the mixture resembles coarse crumbs.
- Gradually add the ice water, one tablespoon at a time, mixing until the dough just comes together. Be careful not to overwork the dough.
- Shape the dough into a disc, wrap it in plastic wrap, and refrigerate for at least 30 minutes.
- Preheat the oven to 400°F (200°C) and line a baking sheet with parchment paper.
- Remove the dough from the refrigerator and divide it into four equal portions.
- Roll out each portion of dough on a lightly floured surface into a circle approximately 8 inches in diameter.
- In a separate bowl, combine the beef, onion, potato, turnip, salt, and pepper.
- Divide the filling evenly among the dough circles, placing it on one half of each circle and leaving a 1/2-inch border around the edges.
- Fold the empty half of each dough circle over the filling to create a semi-circle shape. Press the edges together with a fork to seal the pasties.
- Transfer the pasties to the prepared baking sheet and brush the tops with the beaten egg.
- Use a knife to make a small slit in the top of each pasty to allow steam to escape.
- Bake the pasties for 45 minutes, or until the pastry is golden brown and the filling is cooked through.
- Remove the pasties from the oven and allow them to cool slightly before serving. Enjoy hot or cold on your picnic!
4. Sausage Rolls
Sausage rolls are a perfect savoury snack for a summer picnic. With a variety of fillings and dips, these rolls can be enjoyed hot or cold, making them a versatile snack for any picnic.
Serves: 4
Preparation time: 15 minutes
Cooking time: 20-25 minutes
Tools:
- Mixing bowl
- Knife
- Cutting board
- Rolling pin
- Baking tray
- Pastry brush
Ingredients:
- 500g sausage meat
- 1 onion, finely chopped
- 2 cloves garlic, minced
- 1 celery stalk, finely chopped
- 1 sheet puff pastry, thawed
- 1 egg, beaten
- Optional: variety of dips (ketchup, mustard, spicy mayo)
Instructions:
- Preheat the oven to 200°C (392°F) and line a baking tray with parchment paper.
- In a mixing bowl, combine the sausage meat, chopped onion, minced garlic, and chopped celery to create the filling.
- Roll out the puff pastry on a lightly floured surface and cut it into 8 equal strips.
- Place a generous amount of filling along one edge of each strip, then roll it up and make sure to seal the edges.
- Place the sausage rolls on the prepared baking tray and brush the tops with the beaten egg.
- Bake in the preheated oven for 20-25 minutes, or until the rolls are golden brown and cooked through.
- Allow the sausage rolls to cool slightly before serving with your choice of dips. Enjoy!
5. Cheese and Tomato Tarts
Cheese and tomato tarts are a delicious and nutrient-dense dish that’s perfect for lunch or as a picnic snack. Made with shortcrust pastry, cherry tomatoes, cheese, and herbs, these tarts are not only tasty but also easy to prepare.
Serves: 4
Preparation time: 15 minutes
Cooking time: 20-25 minutes
Tools:
- Rolling pin
- Muffin tin
- Mixing bowl
- Knife
- Flour for dusting
Ingredients:
- 1 package of ready-made shortcrust pastry
- 1 cup cherry tomatoes, chopped
- 1 ½ cups grated cheese (e.g., cheddar, mozzarella, or a mix)
- 2 tbsp chopped fresh herbs (e.g., basil, parsley, or a mix)
- Flour, for dusting
Instructions:
- Preheat your oven to 375°F (190°C).
- Roll out the shortcrust pastry on a floured surface to about ¼ inch thickness.
- Cut out circles of pastry that will fit into the muffin tin cups.
- Press the pastry circles into the muffin tin cups, creating a small well for the filling.
- In a mixing bowl, combine the chopped tomatoes, grated cheese, and herbs.
- Spoon the cheese and tomato mixture into each pastry cup, filling them evenly.
- Bake the tarts in the preheated oven for 20-25 minutes, or until golden brown and crispy.
- Check for doneness by ensuring the cheese is melted and bubbly.
- Remove the tarts from the oven and let them cool for a few minutes before serving.
Feel free to experiment with different vegetables or herbs to create your own unique variations of this recipe. Enjoy your Cheese and Tomato Tarts on your next picnic!
6. Original Chex Mix Recipe
A simple and delicious snack perfect for your next picnic, the Original Chex Mix Recipe is easy to make, customizable, and always a crowd-pleaser. It’s a classic snack that balances sweet, salty, and savory flavors.
Serves: 4
Preparation time: 15 minutes
Cooking time: 1 hour
Tools: Large bowl, Microwave-safe bowl, Baking sheet
Ingredients:
- 3 cups of Corn Chex cereal
- 3 cups of Rice Chex cereal
- 3 cups of Wheat Chex cereal
- 1 cup of mixed nuts
- 1 cup of bite-sized pretzels
- 1 cup of garlic-flavored bagel chips
- 6 tablespoons of butter
- 2 tablespoons of Worcestershire sauce
- 1 1/2 teaspoons of seasoned salt
- 3/4 teaspoon of garlic powder
- 1/2 teaspoon of onion powder
Instructions:
- Preheat your oven to 250°F (120°C).
- In a large bowl, combine the Corn Chex, Rice Chex, Wheat Chex, mixed nuts, pretzels, and bagel chips.
- Melt the butter in a microwave-safe bowl.
- Stir in the Worcestershire sauce, seasoned salt, garlic powder, and onion powder into the melted butter.
- Pour the butter mixture over the cereal mixture and stir until everything is evenly coated.
- Spread the mixture in a single layer on a baking sheet.
- Bake for 1 hour, stirring every 15 minutes.
- Let the Chex Mix cool completely before serving. Enjoy your picnic with this tasty snack!
7. Seven-Layer Taco Dip
Enjoy a delicious seven-layer taco dip at your next picnic with this easy and tasty recipe. This dip combines the flavors of refried beans, sour cream, taco seasoning, guacamole, shredded cheese, diced tomatoes, and sliced black olives to create a mouth-watering appetizer that’s perfect for sharing with friends and family.
Serves: 4
Preparation time: 15 minutes
Chilling time: 2 hours
Tools: Serving dish, Mixing bowl, Spatula
Ingredients:
- 1 cup refried beans
- 1 cup sour cream
- 1 packet taco seasoning
- 1 cup guacamole
- 1 cup shredded cheese (Mexican blend or cheddar)
- 1 cup diced tomatoes
- 1/2 cup sliced black olives
Instructions:
- Spread the refried beans in the bottom of the serving dish.
- In a mixing bowl, combine the sour cream and taco seasoning. Mix well.
- Spread the sour cream mixture on top of the beans in the serving dish.
- Add a layer of guacamole over the sour cream mixture.
- Sprinkle the shredded cheese evenly on top of the guacamole.
- Layer the diced tomatoes over the cheese.
- Top with the sliced black olives.
- Cover the dish and chill in the refrigerator for at least 2 hours before serving.
- Serve with tortilla chips and enjoy!
8. Cowboy Veggie Caviar
Cowboy Caviar is a perfect snack or appetizer for a summer picnic. This healthy and tasty dish is loaded with black-eyed peas, corn, and colorful veggies, and is served with hearty tortilla chips.
Serves: 4
Preparation time: 15 minutes
Chilling time: 1 hour
Tools:
Ingredients:
- 1 can (15 oz) black-eyed peas, rinsed and drained
- 1 can (15 oz) corn, rinsed and drained
- 1 cup diced tomatoes
- 1 cup diced bell peppers (any color)
- 1/2 cup diced red onion
- 2 jalapenos, seeded and finely diced
- 1/2 cup chopped cilantro
- 1/4 cup lime juice
- 1/4 cup olive oil
- 2 cloves garlic, minced
- Salt and pepper, to taste
- Tortilla chips, for serving
Instructions:
- In a large bowl, combine the black-eyed peas, corn, tomatoes, bell peppers, red onion, jalapenos, and cilantro.
- In a separate small bowl, whisk together the lime juice, olive oil, garlic, salt, and pepper to make the dressing.
- Pour the dressing over the veggie mixture and mix well.
- Cover the bowl with plastic wrap and refrigerate for at least an hour to allow the flavors to meld together.
- Serve with sturdy tortilla chips for scooping. Enjoy your tasty and healthy Cowboy Veggie Caviar under the big blue sky!
9. Hidden Valley Ranch Dip with Bacon & Cheddar
A scrumptious and easy-to-make dip that is perfect for picnics, parties, or any occasion where you want to impress your guests with a tasty treat. This Hidden Valley Ranch Dip with Bacon & Cheddar recipe is sure to be a hit.
Serves: 4
Preparation time: 10 minutes
Chilling time: 30 minutes
Tools: Mixing bowl, Measuring cups, Spoon
Ingredients:
- 1 packet of Hidden Valley Ranch Dip Mix
- 1 cup of sour cream
- 1 cup of shredded cheddar cheese
- 1/2 cup of cooked, crumbled bacon
Instructions:
- In a mixing bowl, combine the Hidden Valley Ranch Dip Mix and sour cream. Stir well.
- Add the shredded cheddar cheese and crumbled bacon to the mixture, and stir until evenly distributed.
- Cover the bowl and refrigerate for at least 30 minutes to allow the flavors to meld.
- Serve chilled with carrots, celery, crackers, or chips for dipping. Enjoy your delicious Hidden Valley Ranch Dip with Bacon & Cheddar at your next picnic or gathering!
10. Buffalo Chicken Dip with Tortilla Chips, Crackers or Baguettes
Buffalo Chicken Dip is a crowd-pleaser for any picnic! To make this delicious dip, you will need shredded chicken, buffalo sauce, ranch dressing, and plenty of cheese. Mix all the ingredients together in a bowl and spread it in a baking dish. Bake for 20-25 minutes until the cheese is melted and bubbly. Serve hot with tortilla chips, crackers, or baguettes. This dip is so addictive, you won’t have any leftovers! Enjoy!
Serves: 4
Preparation time: 10 minutes
Cooking time: 20-25 minutes
Tools: Oven, Mixing bowl, Baking dish, Measuring cups
Ingredients:
- 2 cups shredded cooked chicken
- 1 cup buffalo sauce
- 1 cup ranch dressing
- 2 cups shredded cheddar cheese
- Tortilla chips, crackers, or baguettes for serving
Instructions:
- Preheat the oven to 350°F (175°C).
- In a mixing bowl, combine the shredded chicken, buffalo sauce, and ranch dressing.
- Stir in half of the shredded cheddar cheese.
- Spread the mixture into a baking dish and top with the remaining cheese.
- Bake for 20-25 minutes, or until the cheese is melted and bubbly.
- Remove from the oven and let it cool for a few minutes before serving.
- Serve hot with tortilla chips, crackers, or baguettes. Enjoy your picnic!
11. Hot Reuben Dip
Enjoy a delicious and easy-to-make Hot Reuben Dip, perfect for any picnic or party. This classic dip is made with corned beef, sauerkraut, Swiss cheese, and Russian dressing, and is sure to be a hit at your next outdoor gathering.
Serves: 4
Preparation time: 10 minutes
Cooking time: 20-25 minutes
Tools: Large mixing bowl, 9-inch baking dish, Oven
Ingredients:
- 1 cup corned beef, chopped
- 1 cup sauerkraut, drained and chopped
- 1 cup Swiss cheese, grated
- 1/2 cup Russian dressing
Instructions:
- Preheat your oven to 375 F (190° Grad).
- In a large mixing bowl, combine the chopped corned beef, sauerkraut, Swiss cheese, and Russian dressing. Mix well until combined.
- Transfer the mixture to a 9-inch baking dish.
- Bake for 20 to 25 minutes or until the cheese is melted and bubbly.
- Serve hot with your favorite crackers or bread. Enjoy!
12. Caramelized Five-Onion Dip
A creamy and savory dip with layers of flavor, the Caramelized Five-Onion Dip is perfect for picnics. Made from five different types of onions, this dip is best served with chips, crackers, or sliced vegetables.
Serves: 4
Preparation time: 15 minutes
Cooking time: 45 minutes
Tools:
- Large skillet
- Mixing bowl
- Knife
- Cutting board
Ingredients:
- 2 shallots, thinly sliced
- 2 scallions, thinly sliced
- 1 sweet onion, thinly sliced
- 1 yellow onion, thinly sliced
- 1 red onion, thinly sliced
- 2 tbsp olive oil
- 1 cup sour cream
- 1/2 cup mayonnaise
- 1 tbsp Worcestershire sauce
- 1/2 tsp garlic powder
- Salt, to taste
- Pepper, to taste
Instructions:
- In a large skillet, heat the olive oil over medium-low heat.
- Add the thinly sliced shallots, sweet onions, yellow onions, and red onions to the skillet, cooking for about 30 minutes, stirring occasionally, until the onions are caramelized.
- Halfway through cooking, add the scallions to the skillet and continue to cook.
- Once the onions are caramelized, remove the skillet from heat and allow the onions to cool slightly.
- In a mixing bowl, combine the sour cream, mayonnaise, Worcestershire sauce, garlic powder, salt, and pepper.
- Stir the caramelized onions into the sour cream mixture until well combined.
- Serve the Caramelized Five-Onion Dip with chips, crackers, or sliced vegetables for a delicious appetizer.
13. Bruschetta with chilli and lemon zucchini
An easy and delicious picnic snack that combines zesty flavors of lemon and chili with fresh zucchini, perfect for a summer day.
Serves: 4
Preparation time: 15 minutes
Tools:
- Mixing bowl
- Small bowl
- Bread knife
- Baking sheet
- Broiler
Ingredients:
- 2 medium zucchinis
- 1 lemon
- Salt, to taste
- Olive oil
- 1 baguette
- 1 red chili, diced
- Fresh parsley, chopped
Instructions:
- Slice the zucchinis into thin rounds and place them in a mixing bowl.
- Squeeze the juice of one lemon over the zucchini slices, add a pinch of salt, and drizzle with olive oil. Toss the zucchini to coat evenly and set aside to marinate.
- Cut the baguette into thin slices and arrange them on a baking sheet.
- Toast the baguette slices under the broiler for a few minutes until lightly browned.
- In a small bowl, mix together the diced red chili, chopped parsley, and a splash of olive oil.
- Once the bread is toasted, top each slice with a few pieces of marinated zucchini and a spoonful of the chili mixture.
- Serve immediately and enjoy your fresh, zesty bruschetta with chili and lemon zucchini.
14. Classic cheese scones
Enjoy these delicious and easy-to-make classic cheese scones during your next picnic. They’re perfect for sharing and can be customized with your favorite herbs or spices.
Serves: 4
Preparation time: 15 minutes
Cooking time: 12-15 minutes
Tools: Mixing bowl, Baking sheet, Round cutter, Oven
Ingredients:
- 2 cups all-purpose flour
- 3 tsp baking powder
- 1/4 cup unsalted butter, cold and cubed
- 1 cup grated cheese (e.g., cheddar or gouda)
- 3/4 cup milk
- Optional: Chopped herbs or spices, such as paprika or cayenne pepper
Instructions:
- Preheat your oven to 425°F (220°C) and line a baking sheet with parchment paper.
- In a large mixing bowl, combine the all-purpose flour and baking powder.
- Add the cold, cubed butter to the flour mixture and rub it in with your fingertips until the mixture resembles breadcrumbs.
- Stir in the grated cheese, and if using, add any optional herbs or spices.
- Gradually add the milk, stirring until a soft dough forms.
- Lightly flour your work surface and roll out the dough to about 2cm (3/4-inch) thickness.
- Using a round cutter, cut out scones and place them on the prepared baking sheet.
- Bake in the preheated oven for 12-15 minutes, or until the scones are golden brown.
- Remove from the oven, let them cool slightly, and then serve.
Enjoyable salads to prepare as easy food for picnics:
1. Green Rice with Tomatoes, Eggs, and Almonds
Enjoy a delicious and easy-to-make picnic dish with this Green Rice with Tomatoes, Eggs, and Almonds recipe. Packed with flavors and nutrients, this dish is sure to be a hit at your next picnic gathering.
Serves: 4
Preparation time: 15 minutes
Cooking time: 20 minutes
Tools: Saucepan, Frying pan, Mixing bowl
Ingredients:
- 1 cup white rice
- 1 tablespoon olive oil
- 1 onion, chopped
- 1 cup chopped tomatoes
- 1 teaspoon ground cumin
- 1 teaspoon salt
- 4 eggs
- 1/2 cup slivered almonds
Instructions:
- Cook the white rice according to package instructions and set aside.
- In a frying pan, heat the olive oil over medium heat and sauté the chopped onion until translucent.
- Add the chopped tomatoes, ground cumin, and salt to the pan and cook for five minutes.
- In a mixing bowl, beat the four eggs and add them to the pan, stirring continuously until the eggs are cooked through.
- In a separate dry pan, toast the slivered almonds until golden brown.
- Combine the cooked rice with the tomato and egg mixture, and mix well.
- Sprinkle the toasted almonds on top of the rice mixture and serve at room temperature.
2. Macaroni Salad
Nothing screams summer picnic like a classic macaroni salad. Here’s a recipe that’s sure to impress your guests:
Serves: 4
Preparation time: 15 minutes
Cooking time: 10 minutes
Tools: Large pot, Large bowl, Whisk, Mixing spoon
Ingredients:
- 1 lb elbow macaroni
- 1 cup mayonnaise
- 1/4 cup apple cider vinegar
- 2 tbsp dijon mustard
- 1 tsp sugar
- 1/2 tsp salt
- 1/4 tsp black pepper
- 2 celery stalks, diced
- 1/2 red onion, diced
- 1/2 cup diced ham
- 2 hard-boiled eggs, chopped
- 1/4 cup crispy bacon, crumbled
- 1/2 cup shredded cheddar cheese
Instructions:
- Cook the macaroni according to package instructions until al dente. Drain and rinse with cold water.
- In a large bowl, whisk together the mayonnaise, apple cider vinegar, dijon mustard, sugar, salt, and black pepper until smooth.
- Add the cooked macaroni, celery, red onion, ham, eggs, bacon, and cheddar cheese to the bowl and stir until everything is well coated in the dressing.
- Cover and refrigerate for at least 1 hour before serving to allow the flavors to meld together.
- Before serving, give the macaroni salad a quick stir and adjust the seasoning if necessary. You can also add more cheese or bacon on top for extra flavor and texture.
Variations:
- For a healthier option, you can substitute the mayonnaise with greek yogurt or sour cream.
- Add in your favorite vegetables like diced bell peppers, cherry tomatoes, or shredded carrots for more color and nutrition.
- For a spicy kick, add in some diced jalapeno peppers or a pinch of cayenne pepper.
- Experiment with different types of cheese like feta, blue cheese, or pepper jack for a unique flavor.
- Make it a complete meal by adding in some protein like diced chicken, shrimp, or tofu.
Enjoy this creamy and flavorful macaroni salad with your loved ones on a warm summer day. Happy picnicking!
3. 1905 Salad
The 1905 Salad is a classic dish that originated at the Columbia Restaurant in Tampa, Florida. This salad is a mix of fresh iceberg lettuce, ham, Swiss cheese, tomato, olives, and a tangy dressing made with Worcestershire sauce, garlic, and lemon juice. The salad was first served in 1905, and it has been a favorite ever since. It’s a perfect mix of salty, savory, and tangy flavors that will leave you wanting more!
Serves: 4
Preparation time: 20 minutes
Tools: Cutting board, Knife, Mixing bowl, Whisk or fork, Salad serving utensils
Ingredients:
- 1 head iceberg lettuce, chopped
- 8 slices of ham, julienned
- 8 slices of Swiss cheese, julienned
- 2 medium tomatoes, chopped
- 1/2 cup pitted green olives, halved
- 1/4 cup grated Romano cheese
Dressing:
- 1/2 cup extra virgin olive oil
- 4 cloves garlic, minced
- 2 tablespoons Worcestershire sauce
- 1/2 lemon, juiced
- Salt and pepper, to taste
Instructions:
- In a small mixing bowl, combine the extra virgin olive oil, minced garlic, Worcestershire sauce, lemon juice, salt, and pepper. Whisk until well combined and set aside.
- In a large salad bowl, add the chopped iceberg lettuce, julienned ham, julienned Swiss cheese, chopped tomatoes, and halved green olives.
- Pour the dressing over the salad and toss until everything is well-coated.
- Sprinkle the grated Romano cheese over the top of the salad.
- Serve immediately and enjoy!
4. Grape Salad
A delightful and refreshing grape salad that’s perfect for a summer picnic. This simple yet delicious recipe is easy to make and will satisfy your taste buds while keeping you cool on a warm day.
Serves: 4
Preparation time: 10 minutes
Tools: Mixing bowl, whisk or electric mixer, airtight container or covered bowl, cooler with ice packs
Ingredients:
- 4 cups of seedless grapes
- 4 ounces of cream cheese
- 1/2 cup of sour cream
- 1/4 cup of granulated sugar
- 1 teaspoon of vanilla extract
- Optional: chopped pecans or walnuts
Instructions:
- Wash and dry the grapes, then slice them in half.
- In a separate mixing bowl, combine the cream cheese, sour cream, sugar, and vanilla extract. Mix until smooth.
- Add the grapes to the cream cheese mixture and stir until they are evenly coated.
- If desired, add chopped pecans or walnuts for some extra crunch.
- The ideal serving size is about 1/2 cup per person.
- Store the grape salad in an airtight container or covered bowl and keep it chilled in a cooler with ice packs for easy transportation to your picnic. Enjoy!
5. Ina Garten Pasta Salad with Grated Parmesan
Ina Garten, also known as the Barefoot Contessa, is a renowned American chef and cookbook author. Her pasta salad recipe is a refreshing and simple dish perfect for summer gatherings. The ingredients include 1 pound of fusilli pasta, 1/2 cup of freshly squeezed lemon juice, 2/3 cup of olive oil, 2 teaspoons of salt, 1 teaspoon of black pepper, 2 cups of cherry tomatoes, 1 cup of chopped scallions, 2 cups of chopped arugula, and 1 cup of freshly grated Parmesan cheese.
Serves: 4
Preparation time: 20 minutes
Cooking time: 10 minutes
Tools: Large pot, Colander, Large mixing bowl, Whisk
Ingredients:
- 1 pound fusilli pasta
- 1/2 cup freshly squeezed lemon juice
- 2/3 cup olive oil
- 2 teaspoons salt
- 1 teaspoon black pepper
- 2 cups cherry tomatoes, halved
- 1 cup chopped scallions
- 2 cups chopped arugula
- 1 cup freshly grated Parmesan cheese
Instructions:
- Bring a large pot of salted water to a boil. Cook the fusilli pasta according to the package instructions until al dente. Drain the pasta in a colander and set aside to cool.
- In a large mixing bowl, whisk together the lemon juice, olive oil, salt, and black pepper.
- Add the cooked and cooled pasta to the lemon juice mixture, tossing well to combine.
- Add the cherry tomatoes, scallions, arugula, and grated Parmesan cheese to the pasta mixture. Toss gently to combine all the ingredients.
- Serve the pasta salad at room temperature or slightly chilled. For a variation, you can add grilled chicken or shrimp. Enjoy your delicious and easy Ina Garten pasta salad.
6. Amish Potato Salad for Grilled Meats or Sandwiches
A classic dish that is perfect for summer picnics, Amish Potato Salad is made with boiled potatoes, hard-boiled eggs, celery, onion, and sweet pickles, all blended together with a creamy dressing made with mayonnaise, mustard, and vinegar. The salad is then finished off with a sprinkle of paprika. The Amish Potato Salad is a tangy and delicious side dish that pairs perfectly with grilled meats or sandwiches. To make it even more special, you can add some crispy bacon or fresh herbs like dill or parsley. Serve it chilled and enjoy the refreshing taste of summer in every bite.
Serves: 4
Preparation time: 20 minutes
Cooking time: 15 minutes
Tools: Large pot, Mixing bowl, Knife, Cutting board
Ingredients:
- 4 medium potatoes, peeled and cubed
- 3 hard-boiled eggs, chopped
- 1/2 cup celery, chopped
- 1/4 cup onion, finely chopped
- 1/4 cup sweet pickles, chopped
- 1 cup mayonnaise
- 2 tablespoons mustard
- 2 tablespoons vinegar
- Salt and pepper to taste
- Paprika for garnish
- Optional: crispy bacon or fresh herbs like dill or parsley
Instructions:
- Place the cubed potatoes in a large pot and cover with water. Bring to a boil and cook for 10-15 minutes or until the potatoes are fork-tender. Drain and let them cool.
- In a mixing bowl, combine the chopped eggs, celery, onion, and sweet pickles.
- In a separate bowl, whisk together the mayonnaise, mustard, and vinegar. Season with salt and pepper to taste.
- Gently fold the cooled potatoes into the egg mixture. Pour the dressing over the potato mixture and mix until well combined.
- Cover and refrigerate the potato salad for at least 2 hours or overnight for the flavors to meld.
- Before serving, sprinkle with paprika and, if desired, top with crispy bacon or fresh herbs like dill or parsley.
7. Watergate Salad
Watergate Salad is a delightful dessert that has become a staple in picnics and dinner parties. This sweet, creamy salad is made up of marshmallows, pecans, pineapples, and pistachios. The ingredients are mixed with whipped topping to create a unique blend of flavors that are perfect for summertime gatherings. Serve this refreshing dessert at your next picnic and watch it become an instant hit among your guests.
Serves: 4
Preparation time: 10 minutes
Tools: Mixing bowl, Spatula or large spoon, Serving dish
Ingredients:
- 1 (3.4 oz) package instant pistachio pudding mix
- 1 (20 oz) can crushed pineapple, undrained
- 1 cup miniature marshmallows
- 1/2 cup chopped pecans
- 1/2 cup shelled pistachios
- 2 cups whipped topping (such as Cool Whip), thawed
Instructions:
- In a large mixing bowl, combine the pistachio pudding mix with the undrained crushed pineapple. Stir well until the pudding mix is fully incorporated.
- Add the miniature marshmallows, chopped pecans, and shelled pistachios to the bowl. Mix well to combine all ingredients.
- Gently fold in the whipped topping until it is evenly distributed throughout the mixture.
- Transfer the Watergate Salad to a serving dish, cover, and refrigerate for at least 1 hour before serving to allow the flavors to meld together.
- Serve chilled and enjoy your delicious and refreshing Watergate Salad at your picnic.
8. Pasta Salad with Tomatoes and Corn
This summer, enjoy a refreshing and easy-to-make pasta salad with ripe tomatoes and sweet corn. The salad is bursting with fresh flavors of basil, red onion, and tangy vinaigrette. The large chunks of vegetables make it a perfect picnic food or a quick lunch option. The preparation method is simple and takes only 20 minutes to put together. Cook pasta and toss it with fresh vegetables, herbs, and vinaigrette. The salad can be stored in the fridge for up to four days, making it a perfect make-ahead idea. So, grab a bowl of this delicious pasta salad and savor the flavors of summer!
Serves: 4
Preparation time: 20 minutes
Tools:
- Large pot
- Colander
- Large mixing bowl
- Whisk or fork
- Cutting board
- Knife
Ingredients:
- 8 oz pasta (such as fusilli or penne)
- 2 cups cherry tomatoes, halved
- 1 cup fresh corn kernels
- 1/2 cup red onion, thinly sliced
- 1/2 cup fresh basil, chopped
- 1/4 cup olive oil
- 2 tablespoons red wine vinegar
- 1 tablespoon Dijon mustard
- Salt and pepper, to taste
Instructions:
- Bring a large pot of salted water to a boil, then cook pasta according to the package instructions until al dente. Drain pasta in a colander and rinse with cold water to cool it down. Set aside.
- In a large mixing bowl, whisk together olive oil, red wine vinegar, Dijon mustard, salt, and pepper to make the vinaigrette.
- Add the cooked pasta, cherry tomatoes, corn, red onion, and basil to the bowl with the vinaigrette. Toss gently to combine all the ingredients and coat them evenly with the vinaigrette.
- Taste and adjust the seasoning with salt and pepper if needed. The salad can be served immediately or stored in the refrigerator for up to four days. Enjoy your picnic with this delightful pasta salad!
9. Tuna Pasta Salad
Tuna Pasta Salad is the perfect addition to any summer picnic. Creamy but not too rich, with a splash of white wine vinegar and a sprinkle of dried dill, this recipe is a seriously simple pantry meal that gives us cozy nostalgic vibes.
Serves: 4
Preparation time: 10 minutes
Cooking time: 10 minutes
Tools: Large Pot, Mixing Bowl, Spoon or spatula
Ingredients:
- 8 ounces of pasta
- 2 cans of tuna
- 1/2 cup of mayonnaise
- 1/4 cup of white wine vinegar
- 1 tablespoon of dried dill
- Salt and pepper to taste
- Optional: chopped celery, diced red onion, or sliced cherry tomatoes
Instructions:
- Cook the pasta according to package instructions and drain.
- In a separate bowl, mix tuna, mayonnaise, white wine vinegar, and dried dill.
- Add salt and pepper to taste.
- Mix the pasta and tuna mixture together.
- Chill in the fridge for at least 30 minutes before serving.
- For a unique twist, try adding chopped celery, diced red onion, or sliced cherry tomatoes.
- Serve and enjoy! Leftovers can be stored in an airtight container in the refrigerator for up to three days.
10. Chile-Coconut Watermelon Crudo
This Chile-Coconut Watermelon Crudo is a refreshing, sweet, and slightly spicy dish that’s perfect for a summer picnic. The juicy watermelon pairs perfectly with a tangy coconut-lime dressing, while the chili flakes add a hint of heat. This recipe is quick, easy, and sure to impress your friends and family.
Serves: 4
Preparation time: 10 minutes
Tools: Knife, Cutting Board, Mixing Bowl, Spoon, Serving Platter
Ingredients:
- 1 medium-sized fresh watermelon
- 1 cup coconut water
- Juice of 2 limes
- 1 teaspoon red pepper flakes
- Salt to taste
Instructions:
- Rinse the watermelon under cold running water. Pat it dry using a clean kitchen towel.
- Cut the watermelon into thin slices and arrange them on a serving platter.
- In a mixing bowl, combine the coconut water, lime juice, red pepper flakes, and salt. Stir until well mixed.
- Drizzle the mixture evenly over the watermelon slices.
- Serve the Chile-Coconut Watermelon Crudo chilled for a refreshing summer picnic experience.
11. Easy Tomato Cucumber Salad
This Easy Tomato Cucumber Salad is a refreshing and light addition to any picnic or lunch. Packed with juicy tomatoes, crunchy cucumbers, and a tangy vinaigrette, this salad is easy to make and packed with nutrition. Perfect for those warm summer days!
Serves: 4
Preparation time: 15 minutes
Tools: Knife, Cutting Board, Mixing Bowl, Whisk
Ingredients:
- 1 large cucumber
- 2 large tomatoes
- 1/2 red onion
- 1/4 cup olive oil
- 2 tablespoons red wine vinegar
- 1 tablespoon honey
- Salt and black pepper to taste
- Feta cheese or fresh herbs for topping (optional)
- Diced avocado or bell peppers for variation (optional)
Instructions:
- Slice the cucumber and tomatoes into bite-sized pieces.
- Finely chop half a red onion and add it to the bowl with the cucumber and tomatoes.
- In a separate bowl, whisk together the olive oil, red wine vinegar, honey, salt, and black pepper to make the dressing.
- Pour the dressing over the salad and toss to combine.
- If desired, sprinkle feta cheese or fresh herbs on top for added flavor.
- Optionally, add diced avocado or bell peppers for variation.
- The salad can be made ahead of time and refrigerated until ready to serve. Enjoy!
12. Greek Salad with Mediterranean Dressing
Enjoy a refreshing Greek Salad wrap under the sun. Fresh, crisp vegetables, tangy feta cheese, and a simple yet flavorsome Mediterranean dressing, all tucked into a soft tortilla wrap. It’s a healthy, portable, and delicious option for your next picnic.
Serves: 4 wraps
Preparation time: 15 minutes
Cooking time: None
Tools: Large mixing bowl, Whisk, Cutting board, Sharp knife
Ingredients:
- 4 large tortilla wraps
- 2 cups of cherry tomatoes, halved
- 1 large cucumber, diced
- 1 cup of kalamata olives, pitted and halved
- 1 red onion, thinly sliced
- 1 cup of feta cheese, crumbled
- 1 cup of lettuce, shredded
- 1/4 cup of red wine vinegar
- Juice of 1 fresh lemon
- 1/2 teaspoon of dried oregano
- 1/2 cup of extra-virgin olive oil
- Salt and pepper to taste
Instructions:
- In a large bowl, combine the cherry tomatoes, cucumber, kalamata olives, red onion, and feta cheese.
- In a separate small bowl, whisk together the red wine vinegar, lemon juice, dried oregano, and extra-virgin olive oil. Season with salt and pepper to taste.
- Drizzle the dressing over the salad and toss until everything is well coated.
- Lay out the tortilla wraps on a flat surface. Divide the lettuce among the wraps.
- Top the lettuce with the Greek salad, distributing it evenly among the wraps.
- Roll up the tortilla wraps tightly, tucking in the ends to keep the salad inside.
- Cut each wrap in half diagonally and pack them for your picnic. Enjoy!
13. Lentil Salad with Feta
This Mediterranean-style Lentil Salad with Feta combines the hearty texture of lentils with the salty tang of feta, the freshness of vegetables, and a vibrant dressing. It’s a make-ahead dish, perfect for picnics, as the flavor just gets better over time.
Serves: 4
Preparation time: 15 minutes
Cooking time: 20 minutes
Tools: Medium-sized pot, Mixing bowl, Whisk
Ingredients:
- 1 cup of lentils
- 2 cups of water
- 1 cup of cherry tomatoes, halved
- 1 cucumber, diced
- 1/2 cup of crumbled feta cheese
- 1/4 cup of shelled pistachios
- 2 tablespoons of red wine vinegar
- Juice of 1 lemon
- 1 teaspoon of dried oregano
- 1/4 cup of extra-virgin olive oil
- Salt and pepper to taste
Instructions:
- Rinse the lentils under cold water.
- In a medium-sized pot, combine the lentils and water. Bring to a boil over medium-high heat, then reduce the heat and let simmer until the lentils are tender, about 15-20 minutes. Drain and let cool.
- In a mixing bowl, combine the cooked lentils, cherry tomatoes, cucumber, feta cheese, and pistachios. Mix well.
- In a separate bowl, whisk together the red wine vinegar, lemon juice, dried oregano, and extra-virgin olive oil. Season with salt and pepper.
- Pour the dressing over the lentil mixture and toss until everything is evenly coated.
- Let the salad sit for at least 30 minutes before serving to allow the flavors to meld together. Enjoy it as a healthy and delicious picnic food.
14. Quinoa Bowl with Lentils and Mustard Vinaigrette
This delicious Quinoa Bowl with Lentils and Mustard Vinaigrette is a perfect addition to any summer picnic spread. Not only is this dish packed with plant-based protein, it also comes with a zesty kick from a tangy mustard vinaigrette. Best of all, it’s easy to prepare ahead of time and holds up well, making it a convenient and nutritious option for any outdoor gathering.
Serves: 4
Preparation time: 15 minutes
Cooking time: 30 minutes
Tools:
- Medium pot
- Whisk
- Large bowl
- Small bowl
- Measuring spoons and cups
Ingredients:
- 1 cup quinoa
- 2 cups water
- 1 cup green lentils
- 4 cups vegetable broth
- 1/4 cup red wine vinegar
- 1/2 cup extra-virgin olive oil
- Juice of 1 fresh lemon
- 2 tablespoons Dijon mustard
- Salt and pepper to taste
Instructions:
- Rinse the quinoa under cold water until the water runs clear.
- In a medium pot, combine the quinoa and water. Bring to a boil, then reduce heat to low, cover, and let simmer for about 15 minutes or until the quinoa is fluffy and the water has been absorbed.
- In another medium pot, combine the lentils and vegetable broth. Bring to a boil, then reduce heat to low, cover, and let simmer for about 20 minutes or until the lentils are tender.
- While the quinoa and lentils are cooking, prepare the mustard vinaigrette. In a small bowl, whisk together the red wine vinegar, olive oil, lemon juice, and Dijon mustard. Season with salt and pepper to taste.
- Once the quinoa and lentils are cooked, let them cool slightly. Then combine them in a large bowl and pour the mustard vinaigrette over top. Mix well to combine.
- Serve the quinoa and lentil bowl at room temperature or chilled. Enjoy!
15. Easy Fruit Salad
This Easy Fruit Salad is a classic, refreshing dish perfect for a summer picnic. With its vibrant colors and sweet taste, it can serve as both an appetizer and dessert. Customize it to your liking with a variety of seasonal fruits. The sweet honey-based dressing and a touch of citrus zest elevate the fruits’ natural sweetness, making it a sure hit at your next outdoor gathering.
Serves: 4
Preparation time: 20 minutes
Tools: Large bowl, knife, zester, juicer
Ingredients:
- 2 cups of mixed berries (strawberries, blueberries, raspberries)
- 1 cup of chopped melons (cantaloupe, honeydew)
- 2 citrus fruits (oranges or grapefruits), segmented
- 2 tablespoons of honey
- Juice of 1 orange
- Zest of 1 lemon
- Optional: Chopped nuts (almonds or walnuts)
- Optional: Lime or lemon juice to taste
Instructions:
- Wash and chop the berries, melons, and citrus fruits into bite-sized pieces.
- Place the chopped fruit in a large bowl.
- In a small bowl, mix together the honey, orange juice, and lemon zest to create the dressing.
- Pour the dressing over the fruit in the large bowl.
- Toss the fruit gently to ensure it is evenly coated with the dressing.
- For some extra crunch, sprinkle the fruit salad with chopped nuts like almonds or walnuts.
- To add a bit of tang, squeeze some lime or lemon juice over the fruit salad to taste.
- Chill the salad in the fridge for at least an hour before serving to allow the flavors to blend together.
- Serve chilled and enjoy!
16. Strawberry Balsamic Pasta Salad
Searching for a unique and refreshing pasta salad recipe? The Strawberry Balsamic Pasta Salad is a delightful combination of sweet and tangy flavors. It’s loaded with fresh strawberries and crunchy almonds, all coated in a delicious balsamic glaze. Whether you’re planning a summer picnic or looking for a light lunch, this salad is a perfect choice!
Serves: 4 people
Preparation time: 15 minutes
Cooking time: 15 minutes
Tools: Pot, colander, mixing bowl, whisk, knife, cutting board.
Ingredients:
- 2 cups pasta of your choice
- 2 cups fresh strawberries, hulled and sliced
- 1/3 cup balsamic vinegar
- 1/4 cup olive oil
- 2 tablespoons honey
- 1 tablespoon Dijon mustard
- 2 cloves garlic, minced
- Salt and black pepper to taste
- 1/2 cup almonds, chopped
Instructions:
- Cook the pasta according to the package instructions. Once done, drain it using a colander and let it cool.
- While the pasta is cooking, prepare the balsamic glaze. In a bowl, whisk together the balsamic vinegar, olive oil, honey, Dijon mustard, minced garlic, salt, and pepper.
- In a large mixing bowl, combine the cooled pasta and sliced strawberries.
- Pour the balsamic glaze over the pasta and strawberries, tossing well to ensure everything is coated.
- Add in the chopped almonds and mix once more.
- Refrigerate the salad for at least 30 minutes before serving to allow the flavors to meld together. Enjoy your Strawberry Balsamic Pasta Salad!
17. Watermelon And Feta Salad
Begin your picnic with a refreshing and vibrant Watermelon and Feta Salad. This dish combines the juicy sweetness of watermelon with the tangy taste of feta cheese, making it a perfect choice for a summer picnic. The added crunch of cucumber and the unique aroma of mint leaves make this salad irresistible. Get ready to satisfy your taste buds with this easy-to-make salad that’s sure to be a crowd pleaser!
Serves: 4
Preparation time: 15 minutes
Tools: Large bowl, knife, spoon, cutting board
Ingredients:
- 4 cups cubed watermelon
- 1 medium cucumber, thinly sliced
- 1 cup crumbled feta cheese
- 1/2 cup chopped fresh mint
- 1/2 small red onion, thinly sliced
- 1/4 cup olive oil
- 2 tablespoons red wine vinegar
- Sea salt to taste
Instructions:
- Gather all your ingredients.
- In a large bowl, combine the cubed watermelon, thinly sliced cucumber, crumbled feta cheese, chopped fresh mint, and thinly sliced red onion.
- In a separate bowl, whisk together the olive oil and red wine vinegar to make the vinaigrette.
- Drizzle the vinaigrette over the salad and toss gently to combine.
- Chill the salad in the refrigerator for at least 30 minutes before serving.
- Before serving, sprinkle the salad with a pinch of sea salt for an extra burst of flavor.
- Serve and enjoy!
Desserts and sweet treats are a must at picnics:
1. 3-Ingredient Nutella Brownies
ndulge in the decadence of these 3-Ingredient Nutella Brownies. Perfect for a quick and easy dessert, their rich chocolate-hazelnut flavor is sure to impress. Not only are they incredibly tasty, but they’re also super easy to make. Ideal for a picnic or just a sweet treat at home!
Serves: 4
Preparation time: 10 minutes
Cooking time: 15-20 minutes
Tools: Mixing bowl, 8×8 inch baking pan, Toothpick, Oven
Ingredients:
- 1 cup Nutella
- 2 eggs
- 1/2 cup all-purpose flour
Instructions:
- Preheat your oven to 350°F (180°Grad).
- In a mixing bowl, combine the Nutella, eggs, and all-purpose flour.
- Mix until smooth and well combined.
- Pour the batter into a greased 8×8 inch baking pan and spread it evenly.
- Bake for 15-20 minutes or until a toothpick inserted in the center comes out clean.
- Let it cool for a few minutes before slicing and serving. Enjoy your picnic with these delicious Nutella brownies!
2a. Homemade Biscuits – Bacon Jalapeño Biscuits
Incorporating mouth-watering bacon and spicy jalapeños, these biscuits are an excellent choice for a picnic. They’re not only delicious but also easy to make and convenient for outdoor eating.
Serves: 4
Preparation time: 15 minutes
Cooking time: 20 minutes
Tools: Mixing bowl, Baking sheet, Oven, Grater
Ingredients:
- a2 cups high-quality flour
- 1 tablespoon baking powder
- 1/2 teaspoon salt
- 1/3 cup oil
- 3/4 cup milk
- 1 cup cooked and crumbled bacon
- 1/2 cup diced jalapeños
- Butter and local honey (optional)
Instructions:
- Preheat the oven to 425°F (220°C).
- In a mixing bowl, combine flour, baking powder, and salt.
- Add oil and milk to the dry ingredients and stir until the dough forms.
- Mix in the crumbled bacon and diced jalapeños.
- Drop spoonfuls of dough onto a baking sheet.
- Bake for about 15-20 minutes, or until the biscuits are golden brown.
- Optional: Serve with butter and local honey.
2b. Homemade Biscuits – Cheese Biscuits
Cheese biscuits are another perfect finger food for picnics. The savory taste of cheese baked into the dough is an absolute delight and is sure to be a hit at your picnic.
Serves: 4
Preparation time: 15 minutes
Cooking time: 20 minutes
Tools: Mixing bowl, Baking sheet, Oven, Grater
Ingredients:
- 2 cups high-quality flour
- 1 tablespoon baking powder
- 1/2 teaspoon salt
- 1/3 cup oil
- 3/4 cup milk
- 1 cup grated cheese of your choice
Instructions:
- Preheat the oven to 425°F (220°C).
- In a mixing bowl, combine flour, baking powder, and salt.
- Add oil and milk to the dry ingredients and stir until the dough forms.
- Mix in the grated cheese.
- Drop spoonfuls of dough onto a baking sheet.
- Bake for about 15-20 minutes, or until the biscuits are golden brown
3. Classic Nanaimo Bars
Nanaimo Bars are a classic Canadian dessert that will take your picnic experience to a whole new level. Named after the city of Nanaimo in British Columbia, these bars consist of three distinct layers: a base combining chocolate and coconut, a creamy custard filling, and a rich chocolate ganache topping. They originated in the early 1950s and have since become a popular treat across Canada and beyond. With their no-bake convenience and rich, indulgent taste, these Nanaimo Bars will surely delight your picnic guests.
Serves: 4 servings
Preparation time: 30 minutes
Cooking time: 0 minutes (No-bake)
Tools: 8×8-inch square baking pan, Mixing bowls, Double boiler or microwave, Spatula
Ingredients:
- 1/2 cup unsalted butter, melted
- 1/4 cup sugar
- 5 tablespoons cocoa powder
- 1 large egg, beaten
- 1 3/4 cups graham cracker crumbs
- 1 cup shredded coconut
- 1/2 cup unsalted butter, softened
- 2 tablespoons vanilla custard powder
- 3 tablespoons milk
- 2 cups icing sugar
- 4 ounces semi-sweet chocolate
- 2 tablespoons unsalted butter
Instructions:
- Combine the melted butter, sugar, cocoa powder, beaten egg, graham cracker crumbs, and shredded coconut in a medium-sized mixing bowl. Press this mixture into the bottom of an ungreased 8×8-inch square baking pan.
- Beat together the softened butter, custard powder, milk, and icing sugar until smooth. Spread this custard filling over the base in the baking pan.
- Melt the semi-sweet chocolate and 2 tablespoons of butter together using a double boiler or in the microwave. Spread this chocolate ganache evenly over the custard layer.
- Refrigerate the baking pan for at least 2 hours, or until the ganache is firm.
- Cut into bars and serve. Enjoy your delicious Classic Nanaimo Bars at your picnic!
4. Banana Pudding Cookies
Banana Pudding Cookies are the perfect picnic treat! These soft, chewy cookies are packed with the flavor of ripe bananas and a hint of cinnamon. Not too sweet, and perfectly portable, they’re a delightful dessert to share with your family or friends in the great outdoors.
Serves: 4
Preparation time: 15 minutes
Cooking time: 12-15 minutes
Tools:
- Baking sheet
- Parchment paper
- Mixing bowls
- Whisk
- Spatula
- Wire rack
Ingredients:
- 2 ripe bananas
- 1 cup of all-purpose flour
- 1/2 cup of unsalted butter (softened)
- 1/2 cup of granulated sugar
- 1/2 cup of brown sugar
- 1 egg
- 1 teaspoon of vanilla extract
- 1 teaspoon of baking powder
- 1/2 teaspoon of salt
- 1/2 teaspoon of ground cinnamon
Instructions:
- Preheat your oven to 375°F (190°C) and line a baking sheet with parchment paper.
- In a mixing bowl, cream the softened butter and both sugars together until light and fluffy.
- Mash the bananas and add them to the bowl, followed by the egg, and vanilla extract. Mix until well combined.
- In a separate bowl, whisk together the flour, baking powder, salt, and cinnamon.
- Gradually add the dry ingredients into the wet mixture and stir until well combined.
- Using a spoon or cookie scoop, drop the dough onto the prepared baking sheet, spacing the cookies at least 2 inches apart.
- Bake for 12-15 minutes or until the edges are golden brown.
5. Peanut Butter Cheerio Bars
These Peanut Butter Cheerio Bars are perfect for a quick and easy snack or dessert. They offer a delightful blend of nutty and sweet flavors that everyone will enjoy. Plus, they’re versatile – add in mini chocolate chips or drizzle dark chocolate on top. You can also substitute the Cheerios with other cereal options like Rice Krispies or Fruity Pebbles. Bring them to your next picnic and watch them disappear!
Serves: 4
Preparation time: 10 minutes
Chilling time: 30 minutes
Tools: Saucepan, 8×8 inch baking dish, parchment paper
Ingredients:
- 1/2 cup of peanut butter
- 1/2 cup of honey
- 3 cups of Cheerios
Instructions:
- Begin by melting the peanut butter and honey in a saucepan over low heat.
- Once melted, remove the saucepan from heat.
- Add the Cheerios to the mixture and stir until well combined.
- Press the mixture into an 8×8 inch baking dish lined with parchment paper.
- Chill in the refrigerator for about 30 minutes until firm.
- Once firm, cut into bars and serve. Enjoy!
6. Easy Applesauce Cake
This Easy Applesauce Cake is perfect for a picnic treat. It’s moist, flavorful, and with the sweetness coming from applesauce, it’s a healthier dessert option. It’s also incredibly easy to make, so you won’t have to spend all day in the kitchen before your picnic. Just mix, bake, and enjoy!
Serves: 4 people
Preparation time: 15 minutes
Cooking time: 30-35 minutes
Tools: Oven, 8-inch square baking pan, Mixing spoon, Toothpick, Wire rack
Ingredients:
- 1 1/2 cups of all-purpose flour
- 1 cup of unsweetened applesauce
- 1/3 cup of olive oil
- 1/3 cup of Greek yogurt
- 1/2 cup of granulated sugar
- 1 teaspoon of baking soda
- 1 teaspoon of cinnamon
- A pinch of salt
- Powdered sugar (for topping)
Instructions:
- Preheat your oven to 350°F (175°C).
- Grease an 8-inch square baking pan.
- In the baking pan, mix together the all-purpose flour, unsweetened applesauce, olive oil, Greek yogurt, granulated sugar, baking soda, cinnamon, and salt until well combined.
- Smooth the batter evenly in the pan.
- Bake for 30-35 minutes, or until a toothpick inserted into the center comes out clean.
- Let the cake cool in the pan for 10 minutes.
- Transfer the cake to a wire rack to cool completely.
- Once cooled, sprinkle powdered sugar on top.
- Cut the cake into squares and it’s ready to serve at your picnic. Enjoy your easy and delicious picnic cake!
7. Easy Blueberry Cake
A simple, yet delightful blueberry cake that’s perfect for a summer picnic. This cake is infused with fresh blueberries and a hint of lemon zest, making it a refreshing and light dessert. It’s easy to make and will be a surefire hit with your family and friends.

A simple, yet delightful blueberry cake that’s perfect for a summer picnic. This cake is infused with fresh blueberries and a hint of lemon zest, making it a refreshing and light dessert. It’s easy to make and will be a surefire hit with your family and friends.
Serves: 4-6
Preparation time: 15 minutes
Cooking time: 35-40 minutes
Tools: Oven, 9-inch cake pan, Mixing bowls, Whisk, Mixer, Toothpick
Ingredients:
- 2 cups fresh blueberries
- 2 cups all-purpose flour
- 2 teaspoons baking powder
- 1/2 teaspoon salt
- 1/2 cup unsalted butter, softened
- 1 cup granulated sugar
- 2 large eggs
- 1 teaspoon vanilla extract
- Zest of 1 lemon
- 1/2 cup whole milk
- Whipped cream or powdered sugar for serving (optional)
Instructions:
- Preheat your oven to 350°F (175°C) and grease a 9-inch cake pan.
- In a mixing bowl, whisk together 2 cups all-purpose flour, 2 teaspoons baking powder, and 1/2 teaspoon salt.
- In a separate bowl, cream together 1/2 cup softened unsalted butter and 1 cup granulated sugar until the mixture is light and fluffy.
- Beat in 2 large eggs into the butter and sugar mixture one at a time, ensuring each egg is well incorporated before adding the next.
- Stir in 1 teaspoon vanilla extract and the zest of 1 lemon.
- Gradually add the dry ingredients to the butter and sugar mixture, alternating with 1/2 cup whole milk. Ensure each addition is well mixed before adding the next.
- Fold in 2 cups fresh blueberries into the batter.
- Pour the batter into the prepared cake pan.
- Bake in the preheated oven for 35-40 minutes, or until a toothpick inserted into the center of the cake comes out clean.
- Allow the cake to cool before serving. Optionally, serve with whipped cream or a dusting of powdered sugar. Enjoy your picnic with this easy and tasty blueberry cake!
8. Apple ‘doughnuts’
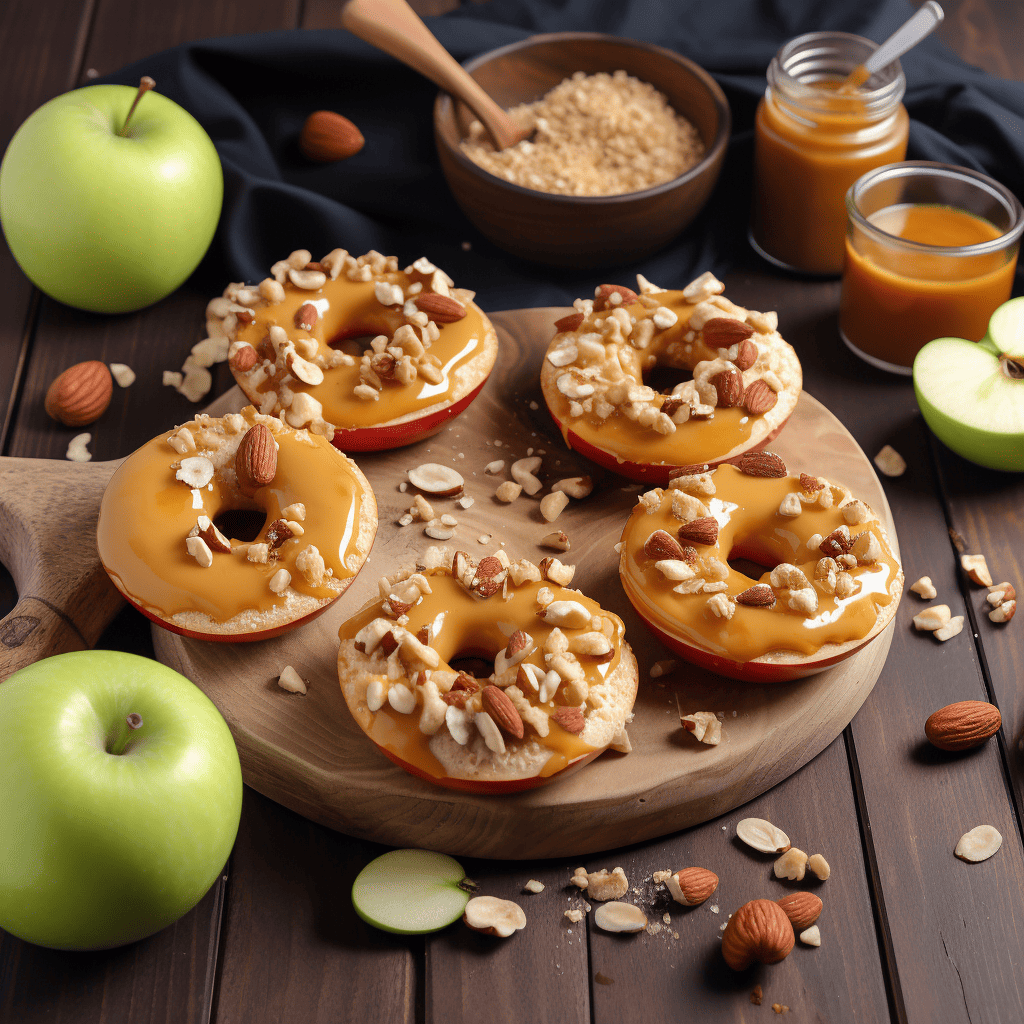
Looking for a healthier and fun sweet treat for your summer picnic? These apple ‘doughnuts’ are light, delicious, and easy to make. With a core of juicy apple, a spread of your favorite nut butter or soft cheese, and a sprinkle of your favorite toppings, they’re sure to please both kids and adults!
Serves: 4
Preparation time: 15 minutes
Tools: Apple corer, Knife, Spreading knife, Baking parchment, Small box for packing
Ingredients:
- 4 large apples
- 1 cup of nut butter or soft cheese
- Your favorite sprinkles for decoration
Instructions:
- First, wash and dry the apples.
- Use the apple corer to remove the core from each apple.
- Next, slice the apples horizontally to form rings.
- Spread a generous amount of nut butter or soft cheese on each apple ring.
- Sprinkle your desired toppings over the nut butter or soft cheese.
- Finally, pack the apple ‘doughnuts’ in a small box lined with baking parchment. They’re now ready to take to your picnic!
How to Plan the Perfect Picnic Menu, Including Potlucks
Budget: Keep costs low by using affordable ingredients, leftovers, homemade snacks, and drinks while keeping the menu simple.
Weather Conditions: Factor in temperature, humidity, wind, and rain when planning your menu; opt for covered, sheltered picnic sites if rain is possible.
Number of People: Estimate attendees and prepare enough food, considering dietary restrictions.
Food Preferences: Offer a mix of vegetarian, vegan, and gluten-free options with a cohesive theme.
Availability of Food: Utilize seasonal produce for a flavorful, sustainable menu.
Type of Picnic: Adapt your menu to the occasion and guest preferences (family, romantic, group, solo, or potluck). For potlucks, coordinate dishes with attendees to ensure variety and balance.
Cooking Method: Choose grilling, boiling, baking, pickling, or marinating as needed. Some picnic sites offer grilling facilities, making it convenient for a cookout.
Type of Food: Include classic options like sandwiches, pasta salads, grilled dishes, and desserts.
Side Dishes: Pick easy-to-make, transportable sides that balance flavors and textures, such as starchy, veggie, and salad options.
Desserts: Opt for portable, refreshing desserts that won’t melt and feature seasonal fruits.
Picnic Site: Choose locations with existing tables and consider covered or sheltered areas for added protection from potential rain or sun.
PS: Elevate your picnic experience with luxurious picnicware that adds a touch of elegance to your outdoor dining. Discover exquisite designs, premium materials, and functional accessories that make your picnic moments truly memorable. Explore the world of luxury picnicware and enhance your next outing with style and sophistication. Click here to discover the finest collection of luxury picnicware for your ultimate outdoor indulgence.
FAQ for picnic food ideas and events
How do you pack a picnic basket?
To pack a perfect picnic basket, start with a sturdy basket or cooler with plenty of room for all your food. Use a layering technique to prevent crushing and pack items in airtight containers to keep them fresh. Don’t forget to bring along essential items like utensils, napkins, and a blanket.
Pack drinks separately in a cooler with ice to keep them cold. Consider bringing along a cutting board and knife for on-the-spot food prep. Finally, choose food that is easy to transport, serve, and eat, like sandwiches, wraps, pasta salads, and dessert bars. With these tips, you’ll be ready for a delicious and stress-free picnic!
What are some picnic snacks to bring?
There are many delicious and easy-to-transport snacks for your next picnic. Try packing a crudité platter with white bean dip and marinated feta, or making deviled eggs with a spicy kick from pickled jalapeños.
For a fun twist on Caprese salad, make skewers with cherry tomatoes, basil, and mozzarella, or add diced peaches for sweetness. And don’t forget the bread!
Rosemary focaccia is a great choice to pair with a cheese board, vegetable sticks, or salad. These snacks are perfect for both kids and adults and will make your picnic a hit!
What are some picnic food recipes that are suitable for vegetarians?
For a perfect summer picnic, vegetarian picnic food recipes are a must-try. Here are five creative and delicious vegetarian picnic food ideas that are easy to make, cheap, and perfect for picnicking: Chickpea Salad Sandwich, Veggie Flatbreads, Multi-Layered Bake, Caprese Sandwich, and Heirloom Tomato Sandwich.
These recipes are compact, easy to transport, and can be made ahead of time. They’re also perfect for sharing with friends and family. So, grab a picnic blanket and enjoy the beautiful weather with these delicious vegetarian picnic food ideas.
What are some picnic food ideas that are kid-friendly?
Here are five easy and yummy picnic food ideas for kids:
monster wraps made with healthy ingredients,
apple bites that are both sweet and healthy,
s’mores shaped like starfish for a beach-themed picnic,
picnic boxes filled with boxed treats and games for a fun birthday celebration, and
ice-cooled milkshakes that are perfect for hot summer days.
These kid-friendly options are easy to prepare and will surely satisfy your little ones’ taste buds!